| Animations/ Animation Controls |
Animation ControlsBesides creating an animation, there are a number of controls for the animation system that you need to set, such as the length, and the type of time code and video system to use. This tutorial shows you the animation controls that are available in Realsoft 3D.Animation lengthYou can change the total length of your animation at any time using the frame count field in the animation window.
To add new frames to your animation (increase the length), enter the desired value in the field and press the Enter key. A dialog appears asking if you want to scale the timelines for any animated objects. To add new frames without affecting the length of any currently defined animations, select No (do not scale the time lines). If you want to scale the existing animation timelines to include the new frames being added, select Yes. You remove frames (shorten) from an animation by the same process as adding frames: type a new length into the frame count field and press Enter. However, be aware that if you decrease the total number of frames to less than the length of any particular choreograph, and do not scale the timelines, such choreographs will be affected. Again, you always have the option of using the Time Lines tab of the choreography editor to make adjustments.
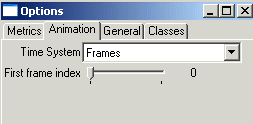
Setting the time code and video systemBefore you start an animation project, you should set the type of time system and video system to use. To access the Time code settings, open the Preferences window from the main menu ('File/Preferences/Window'), and click the 'Animation' tab.
For the Time System, you have three options:
The time line showing real time units The video system can be selected from the Animation Settings window. You can find this window below the select window in the default startup project, and in the Windows pull down menu. Suspending and resuming animation renderingRealsoft 3D allows you to start and stop the rendering of a project or scene at any time, without losing the work that has been performed. This is quite useful when rendering long animation sequences.Assume that you have started rendering a long animation, say 1200 frames, and you want to stop the rendering for some reason, and then resume it again later from the point at which it was stopped. The controls for doing this can be accessed either from the file rendering window, or from the main menu. To stop rendering an animation, press the Stop button on the file rendering window, or make the following selection from the main menu: Animation/Playback/Stop. Then use File/Save As to save the entire project. The current time is saved with the project. You can then load the project again at any time, and click the Render Animation button on the file rendering window to continue rendering the project.
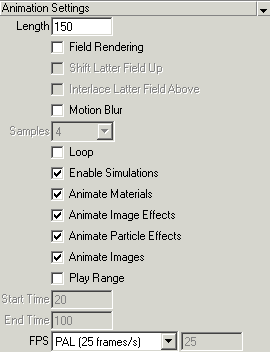
Defining project-specific animation settingsEvery time you create a new animation, you have to define a number of project-specific animation options. For example, you have to decide whether to use motion blur. You might also want to use field rendering. These options can be defined through the Animation Settings window. You can find this window below the select window in the default startup project.
If you select the Motion Blur option, you also need to specify the desired sample count in the Samples field. The higher the value, the better the quality of the generated motion blur (Note that higher values will affect your rendering time). If field rendering or motion blur is activated, the animation playback window will show gadgets that allow you to control and select time in units of fields and motion blur samples, as well as frames. This allows you, for example, to access the time line at finer resolutions, such as Frame=2, Field=odd, and Sample=3, and then, for instance, modify an object to create a key frame. You can also define Start
frame and End frame attributes which allow you to play desired sub range
of the animation. Check Play
range and enter desired start frame and end frame values to activate sub
range feature. This also adds range knots to the time slider. You can drag
the knots to adjust the frame range.
|


